

Last Updated: October 2026
You hit the wall bounce in the Firing Range. Then a real fight starts, you stare at the wall, miss the timing, and get deleted with your gun holstered.
This Apex movement guide fixes that gap. You'll build reliable slide jumps, climbs, wall bounces, and optional advanced tech—but every drill ends with cover, a shot, or a reset. The goal isn't to look fast. It's to make better decisions at speed.
This guide is current for Season 30: Marked. EA's current season overview confirms the August 4 launch, World's Edge changes, and the live season baseline.
⚡ Quick answer: Learn sprinting and sliding first, then slide jumping, climbing, and wall bouncing. Add superglides or mouse-and-keyboard tap strafes only after the basics work in a fight. A clean slide jump into cover beats a failed highlight move in the open.
Table of Contents
- The movement order that actually works
- Slide jumping
- Climbing and mantling
- Wall bouncing
- Advanced movement
- 15-minute practice routine
- Movement in real fights
- FAQ
Apex Movement Guide: Learn the Tech in This Order
Apex already gives every Legend useful movement before abilities enter the picture. The Apex Legends Wiki movement reference documents sprinting, sliding, wall climbing, bunny hopping, wall bouncing, supergliding, and tap strafing as separate mechanics with different input demands.
That doesn't mean you should train all of them at once.
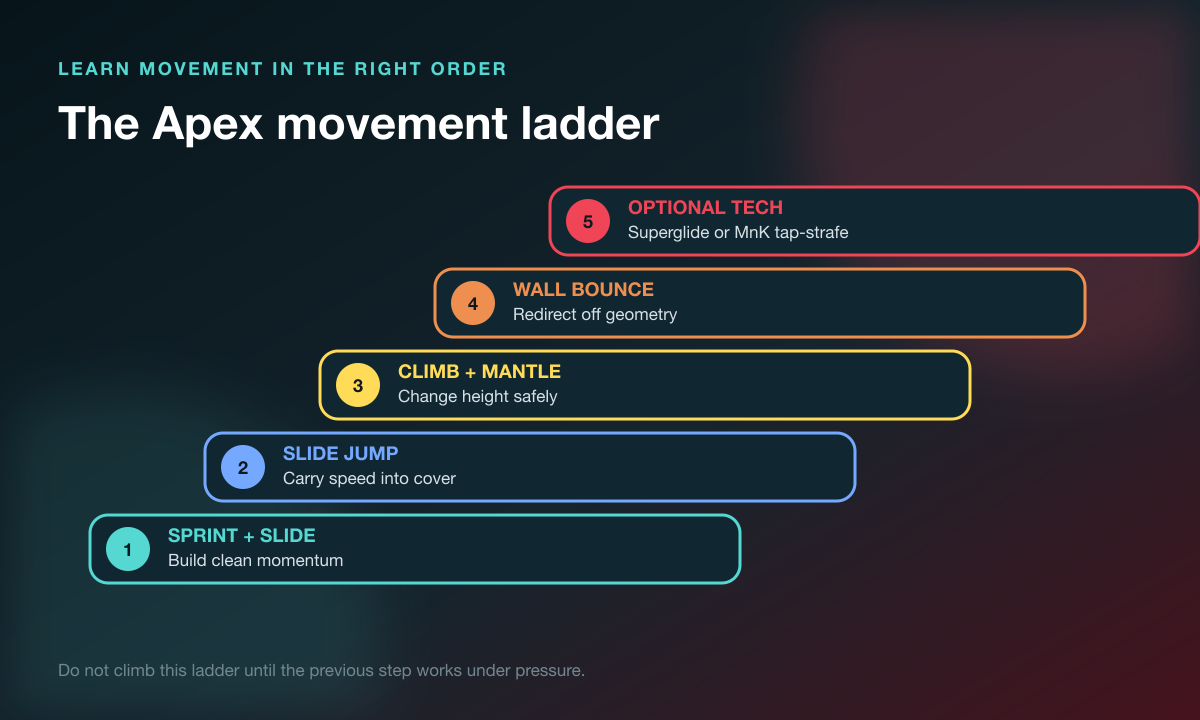
Use this progression:
- Sprint and slide: Build speed without thinking about it.
- Slide jump: Carry momentum through rotations and into cover.
- Climb and mantle: Change height without arriving helpless.
- Wall bounce: Redirect momentum around useful geometry.
- Optional tech: Add superglides or tap strafes when they solve a real problem.
I believe most players learn movement backward. They chase the hardest input because the clip looks sick, while their normal slide starts too early and dies before the doorway.
Make each layer boringly repeatable. Then add the next one.
Slide Jump Without Killing Your Momentum
A slide jump is the foundation because it links running, cover, aim, and every more advanced route. Crouch while moving fast enough to slide, then jump while the slide still has speed.
The underlying rule is simple: speed first, crouch second, jump third. The movement wiki notes that jumping out of a slide preserves momentum longer than jumping from a sprint, while downhill terrain can extend or accelerate a slide.
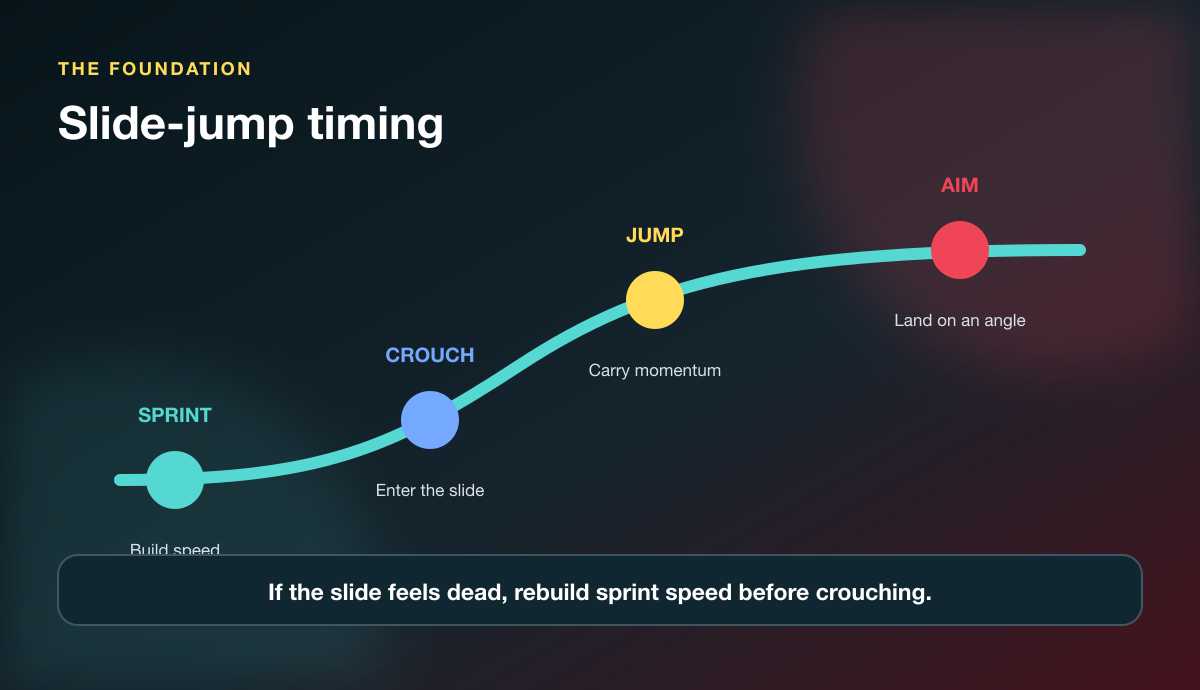
Use this input sequence
- Sprint until your character has built full running speed.
- Crouch to enter the slide.
- Jump while the slide is still carrying you.
- Put the crosshair on the next angle before you land.
If you get a dead slide, stop blaming the jump input. You probably crouched before you rebuilt enough horizontal speed, landed into bad terrain, or tried to chain another boost too quickly.
The drill
Pick two pieces of cover in the Firing Range. Slide jump from the first to the second, land with your crosshair on a target, then reverse the route.
Do 10 clean repetitions in both directions. A rep only counts if you keep speed and finish ready to shoot.
⚠️ Watch Out: Repeated jumping in open space can make your path easier to read and can wreck your own aim. Slide jump to reach cover or change an angle—not because your hands need something to do.
Climb, Mantle, and Land Ready to Shoot
Wall climbing is basic movement, but bad climbs lose fights. Holding jump into a vertical surface starts the climb; reaching the top transitions into a mantle. The wiki documents a normal climb at roughly six meters before the Legend falls away if no ledge is reached.
The mistake is climbing the first wall you see while an enemy owns the top edge. Your head arrives first, your weapon isn't ready, and the other player gets a free shot.
Before climbing, answer three questions:
- Is the top edge safe? Listen, scan, and use your teammate's angle.
- Where will I move after the mantle? Pick left cover, right cover, or a drop-back route before committing.
- Can my teammate trade me? A solo mantle into two guns isn't movement tech. It's a donation.
Use short climbs to vary your peek. Use full mantles when the height changes the fight. If the high ground is watched, fake the climb sound, drop, and let your teammate punish the player staring at the ledge.
If ranked positioning is the bigger problem, pair these mechanics with our Apex ranked system guide. Movement gets you to the angle; good timing decides whether the angle is worth taking.
Wall Bounce With Four Clean Inputs
A wall bounce redirects a slide jump away from a wall. The reliable version is less about mashing jump and more about removing one input at the right moment.
The Apex Movement Wiki wall-bounce breakdown gives the core sequence: slide jump toward the wall, release forward, make brief wall contact, then jump away.
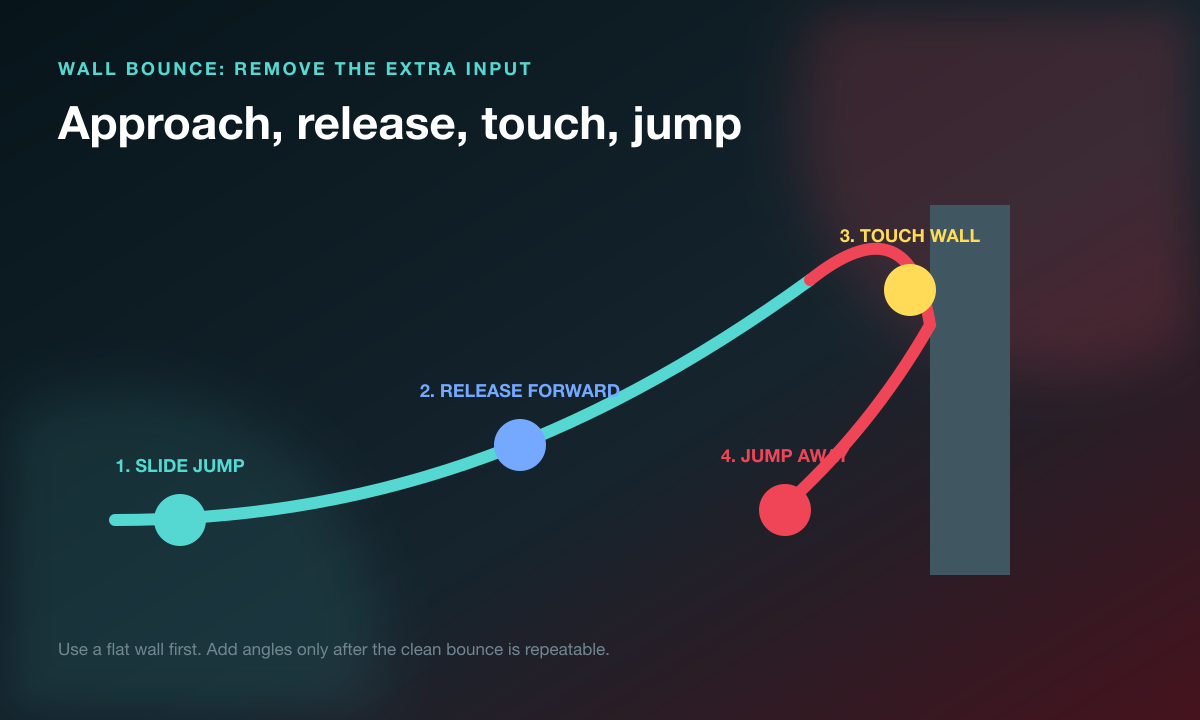
Use this sequence
- Approach: Sprint and slide jump toward a flat wall.
- Release: Let go of forward before contact.
- Touch: Allow the brief climb connection to register.
- Jump: Bounce away with your sideways input aimed at the exit.
Start nearly perpendicular to a flat wall. Once 8 of 10 attempts work from both sides, change the approach angle. Don't start on a messy rock, curved prop, or tiny surface and call the mechanic inconsistent.
When a wall bounce is useful
- Crossing a doorway without walking through its center
- Breaking a close-range opponent's tracking
- Reaching a ledge while skipping a slow, obvious climb
- Re-peeking from a different height or exit line
The bounce needs a destination. If you land in the same open lane with no shot and no cover, you spent mechanical effort to stay vulnerable.
Advanced Apex Movement: Superglides, Tap Strafes, and Bunny Hops
Advanced tech belongs after the fight-ready basics, not before them.
Superglide
A superglide launches you from the top of a mantle by pressing jump and crouch together in a very small timing window. The movement reference records the initial boost at about 10.3 m/s, but the real value is the sudden horizontal exit from a predictable ledge animation.
Practice it on one consistent box. If you cannot reproduce it, use a normal mantle and keep your gun plan intact. Failed inputs at the top of cover are expensive.
Tap strafe
A tap strafe lets mouse-and-keyboard players redirect momentum in the air through rapid forward inputs plus a turn. The wiki specifically notes that the technique requires simultaneous directional inputs and is not available through normal controller inputs.
Treat it as an input-specific option, not the price of playing Apex. Controller players can still master slide timing, air steering, wall bounces, mantles, and clean cover routes.
Bunny hop
Bunny hopping uses repeated small jumps to preserve momentum by reducing ground contact. It can help carry speed around a corner, but balance rules limit some actions while hopping. Don't build your entire reset around an interaction you haven't verified in the current patch.
The test for every advanced technique is brutal and fair: did it create cover, an angle, a reset, or damage? If not, it was decoration.
A 15-Minute Apex Movement Practice Routine
Long practice sessions feel productive because you're busy. Short, measured sessions improve faster because you can tell what changed.
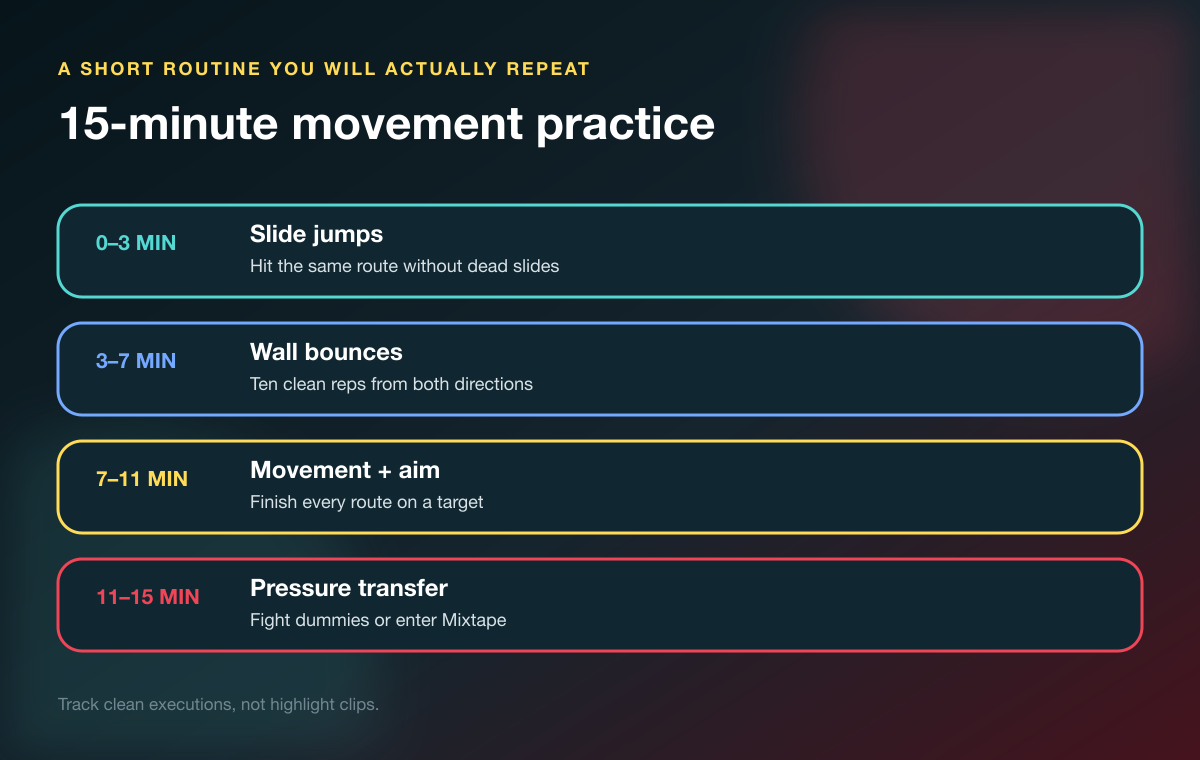
Minutes 0–3: slide-jump route
Run one short route between cover pieces. Count clean landings with your crosshair already attached to the next target.
Minutes 3–7: wall bounces
Do 10 attempts from each direction on the same wall. Record clean contacts, not distance or style.
Minutes 7–11: movement plus aim
Add a target at the end of every route. Fire only after your movement creates a readable shot; don't spray during the input just to make the drill harder.
Minutes 11–15: pressure transfer
Fight active dummies or enter a faster mode. Give yourself one goal for the session: spot wall-bounce opportunities, slide jump into cover, or mantle with a teammate's angle.
The Apex Movement Wiki's fight-transfer guide makes the same crucial distinction: practicing execution in a dry environment and recognizing opportunities under stress are different stages.
If you want a second set of eyes, find a consistent Apex teammate on Tapin. Ask them to call out dead slides, exposed landings, and the moments you moved without gaining anything. That feedback is more useful than another hour of silent reps.
Make Apex Movement Survive a Real Fight
Movement fails in matches because attention gets overloaded. You track the enemy, ammo, abilities, health, cover, footsteps, and your squad—then expect a new input sequence to run perfectly on top of it.
Give the mechanic one job.
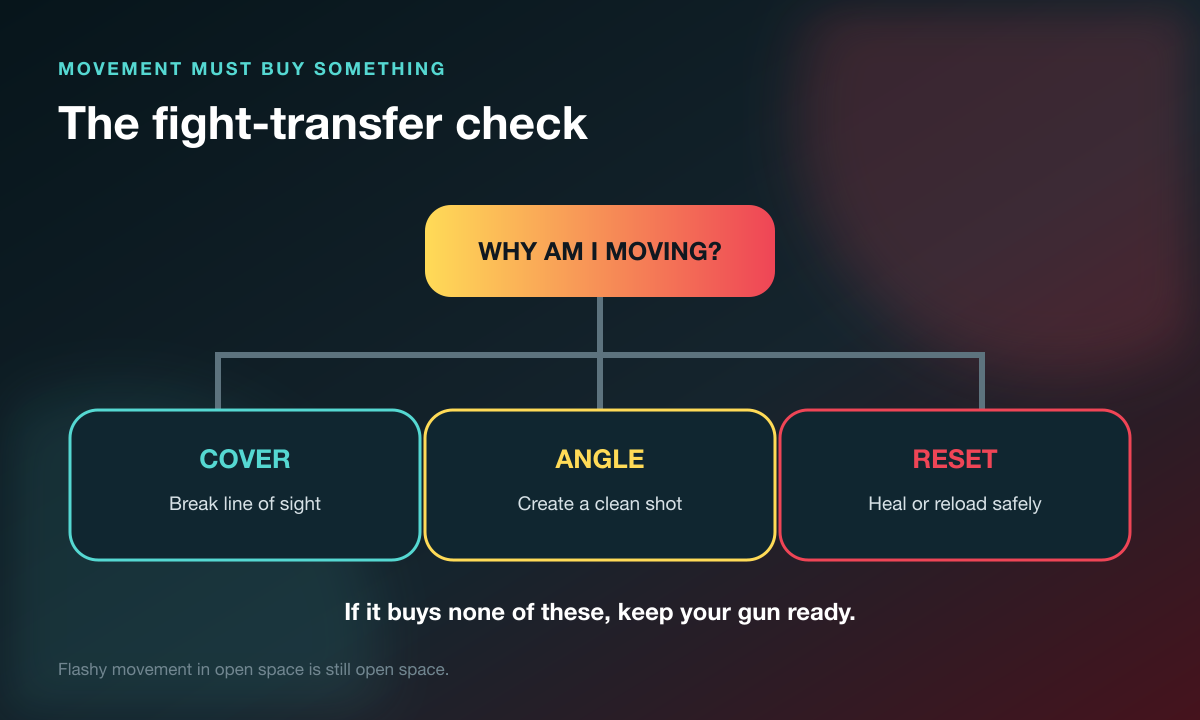
Before moving, pick the result:
- Cover: Break line of sight before healing or reloading.
- Angle: Leave one lane and arrive with a clean shot from another.
- Reset: Buy enough space to restore resources or regroup.
Call the route in plain language: "bouncing left," "climbing roof," or "sliding back to you." Your teammate doesn't need the tech name. They need to know which angle disappears and which one opens.
Review one failed fight after the session. Pause before the movement starts and ask:
- What was I trying to buy?
- Did the route end in usable cover?
- Was my gun ready when I landed?
- Could my teammate see or trade the fight?
For a full review structure, use our Apex coaching guide. If you want context on the lobbies you're training for, the Apex rank distribution guide explains what the visible tiers represent in a tracked sample.
Apex Movement Guide FAQ
What movement should an Apex beginner learn first?
Learn sprinting, sliding, and slide jumping first. Add climbing and wall bouncing after you can land near cover with your weapon ready. Those mechanics appear in far more fights than frame-tight advanced tech.
Can controller players wall bounce in Apex Legends?
Yes. A basic wall bounce uses movement, crouch, and jump inputs available on controller. Tap strafing is different: the standard technique depends on rapid multi-directional mouse-and-keyboard inputs.
Why do I keep getting dead slides?
You usually crouched before rebuilding enough horizontal speed, landed on terrain that interrupted momentum, or tried to force another slide too soon. Slow the route down and make the sprint phase obvious before crouching.
Is supergliding required to rank up?
No. Superglides can create strong mantle exits, but cover use, timing, aim, and squad coordination decide far more fights. Treat the superglide as an option, not a ranked requirement.
How long should I practice Apex movement?
Start with 15 focused minutes. Track one technique, attach it to a shot or cover route, then test it under pressure. Stop when your inputs get sloppy; tired repetitions teach tired timing.
Clean movement has a destination. Build the slide jump, make the wall bounce repeatable, and train every route with your gun and teammate in mind.
Then take one mechanic into real fights until it stops feeling like a trick and starts feeling like a decision.